PLEASE NOTE!
All software on this page was developed by a third party, unless stated otherwise. We cannot provide support for software we did not develop, so please contact the developer of that software directly if you are having any problems.
Plugins
WordPress
Click here to download
- Integrates Clicky tracking code automatically into your site (or sites, with WPMU).
- An overview of your site's statistics in your WordPress admin dashboard.
- Track HTML5 and Youtube videos.
- Option to show 'top pages' at end of each article, based on data pulled from the Clicky API.
- Seeing "draw() method" errors? Double check your site ID / sitekey values. Also this error may display within the first 24 hours of your site being live on Clicky.
Drupal
Click here to download
- This module helps you integrate Clicky with your Drupal website in a snap.
- Stats Dashboard (in an iframe)- both next to the settings page and under your site's Reports menu.
- Show banner image in a block and/or in the html footer - good for the affiliate program. Several images available.
- User role tracking - define what user roles should be tracked by get clicky. Drupal admin pages are never tracked.
- User segmentation - needs the drupal core profile module enabled. If your users have profile fields completed, you can track your logged in users based on a defined profile field.
- Advanced section - you can add custom Clicky Javascript code here.
Django Analytical
Click here to download
- Integrate Clicky tracking (as well as some other popular analytics services) into your Django-based website.
- Automatically logs the name of any logged in user to Clicky.
- Has options for other customized tracking methods.
- Detailed documentation is available here.
- Manually installing the code? Make sure to disable 'SECURE_REFERRER_POLICY', or set no stricter than 'origin-when-cross-origin', otherwise tracking may not work because of domain validation.
Joomla
Click here to download
- Works with Joomla 3 and 4
- Automatically places the asynchronous version of the Clicky tracking code on every page of your Joomla website.
- Options to exclude admin and backend traffic.
- Attaches username and email info to session data on Clicky for visitors who are logged in.
- Make sure you install the right version of the plugin. When you unzip there will be 3 or more files, each one for a different version of Jooma. If you install the wrong version, you may see an error such as Fatal error: Class 'JParameter' not found. This error is the result of using the wrong plugin!
Angular
Click here to download
- Just add Angulartics to your app dependencies and you'll get automatic pageview tracking for your application routes.
MyBB
Click here to download
- Integrates Clicky tracking code into MyBB forum software.
Ruby Rack
Click here to download
- Rack Middleware to embed the Clicky tracking code.
Concrete5
Click here to download
- Add-on that allows you to integrate your Concrete5 site with Clicky as quickly and as easily as possible.
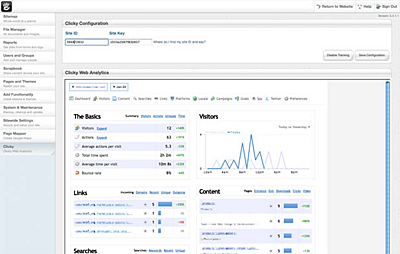
- View your reports right from your Concrete5 dashboard.
PrestaShop
Click here to download
- Integrate tracking into your PrestaShop website, as well as log customer names and emails, track goals (including revenue) for purchases, and display stats in the admin area of your website.
- Note: This is a paid-only plugin.
Vanilla forums
Click here to download
Track your Vanilla forums. Usernames and emails of users will be logged automatically!
WHMCS
Click here to download
WHMCS is an all-in-one client management, billing & support solution for online businesses. Handling everything from signup to termination, WHMCS is a powerful business automation tool that puts you firmly in control.
Tracking code install
Cloudflare (Zaraz)
Aside from plugins, the easiest way to add your tracking code to your website's HTML is via
Cloudflare Zaraz 
.
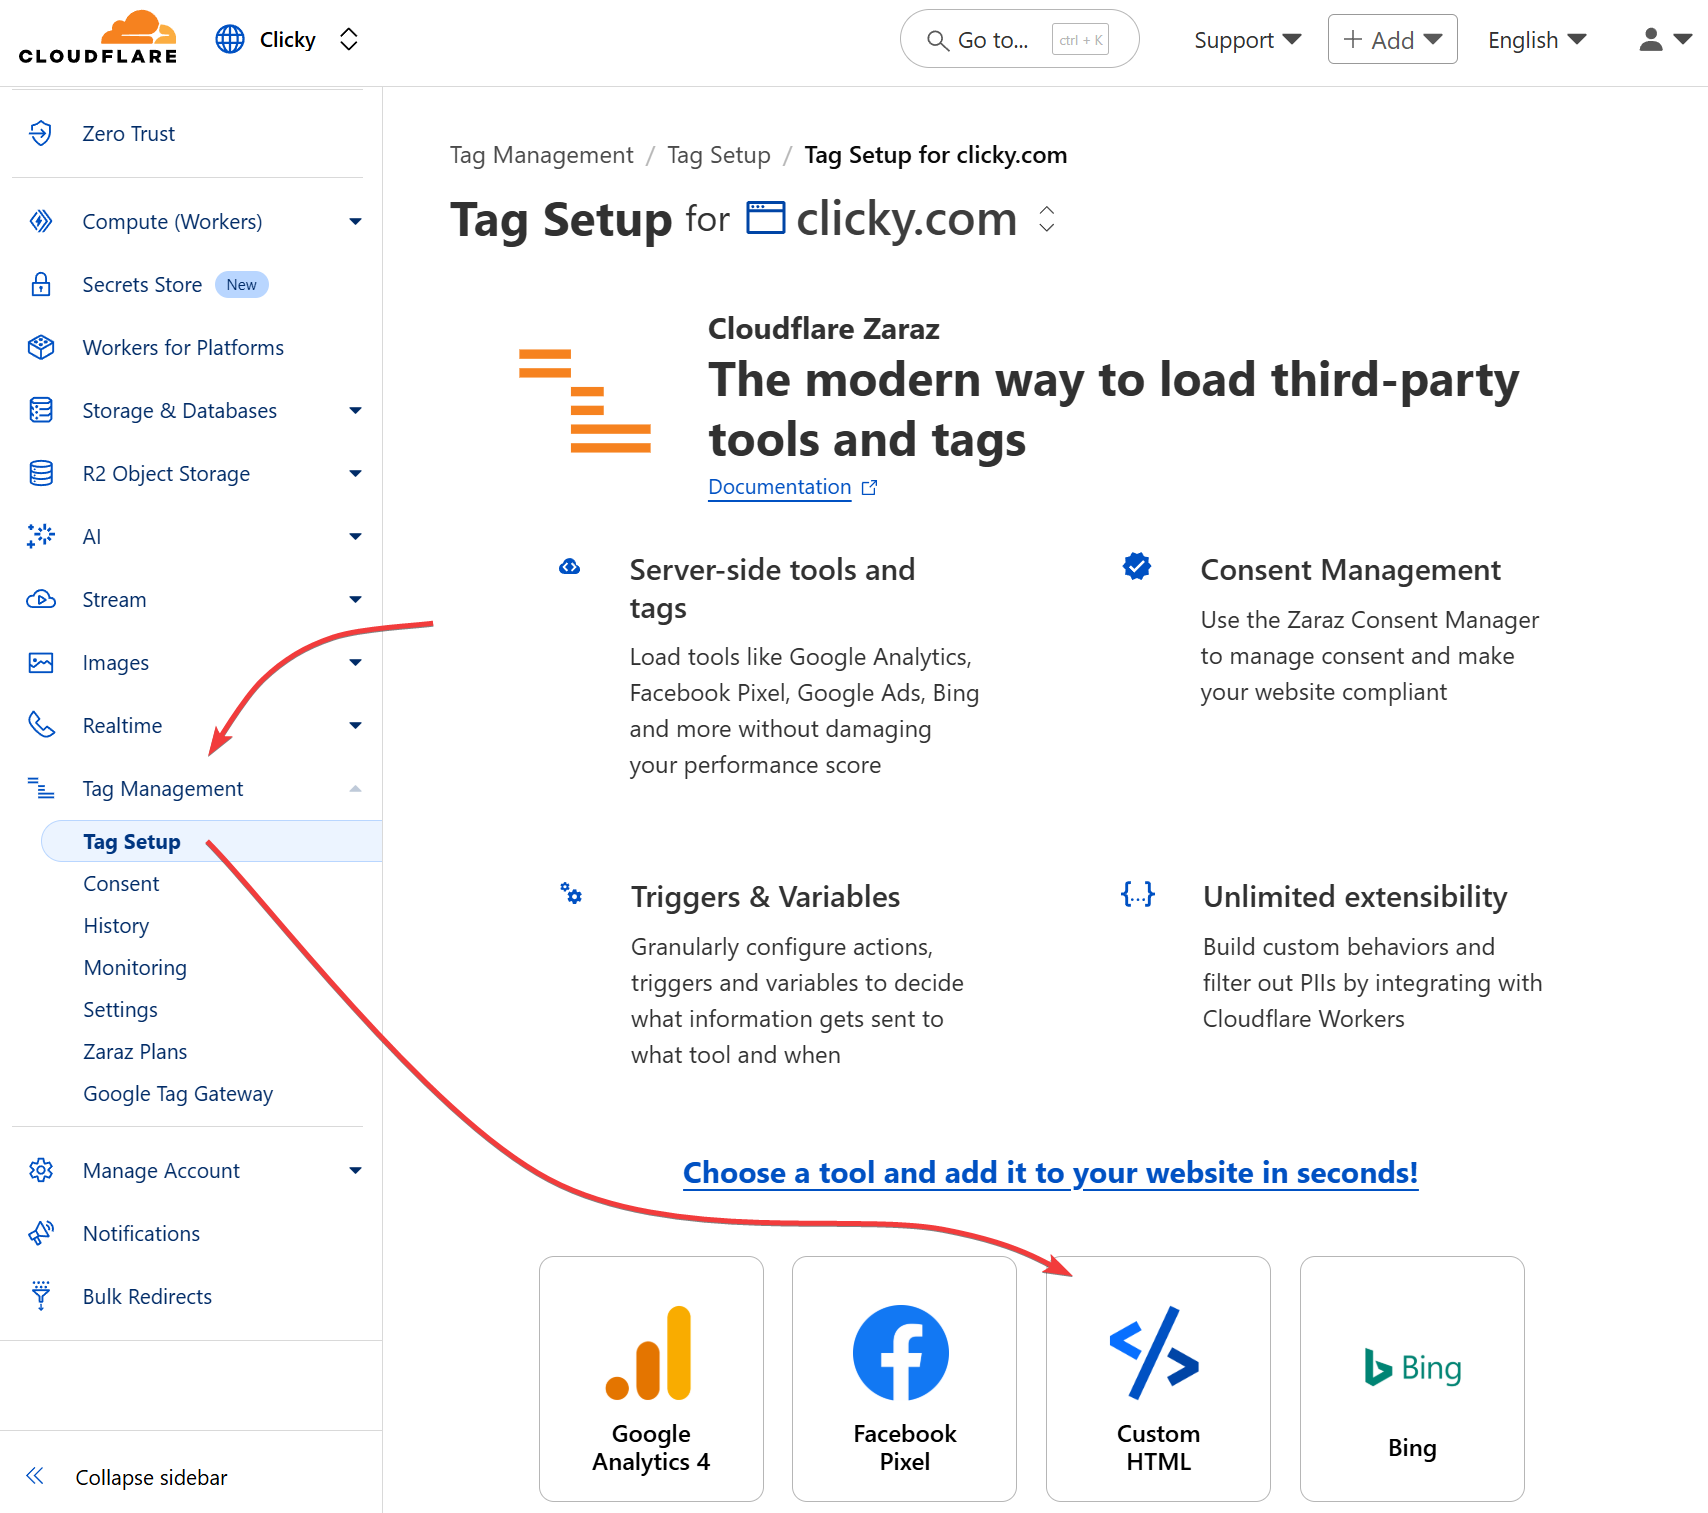
Click the "Tag Management" link in your Cloudflare
account dashboard (
not your
site dashboard), then click the site you want to manage. From the list of tools, select "Custom HTML":
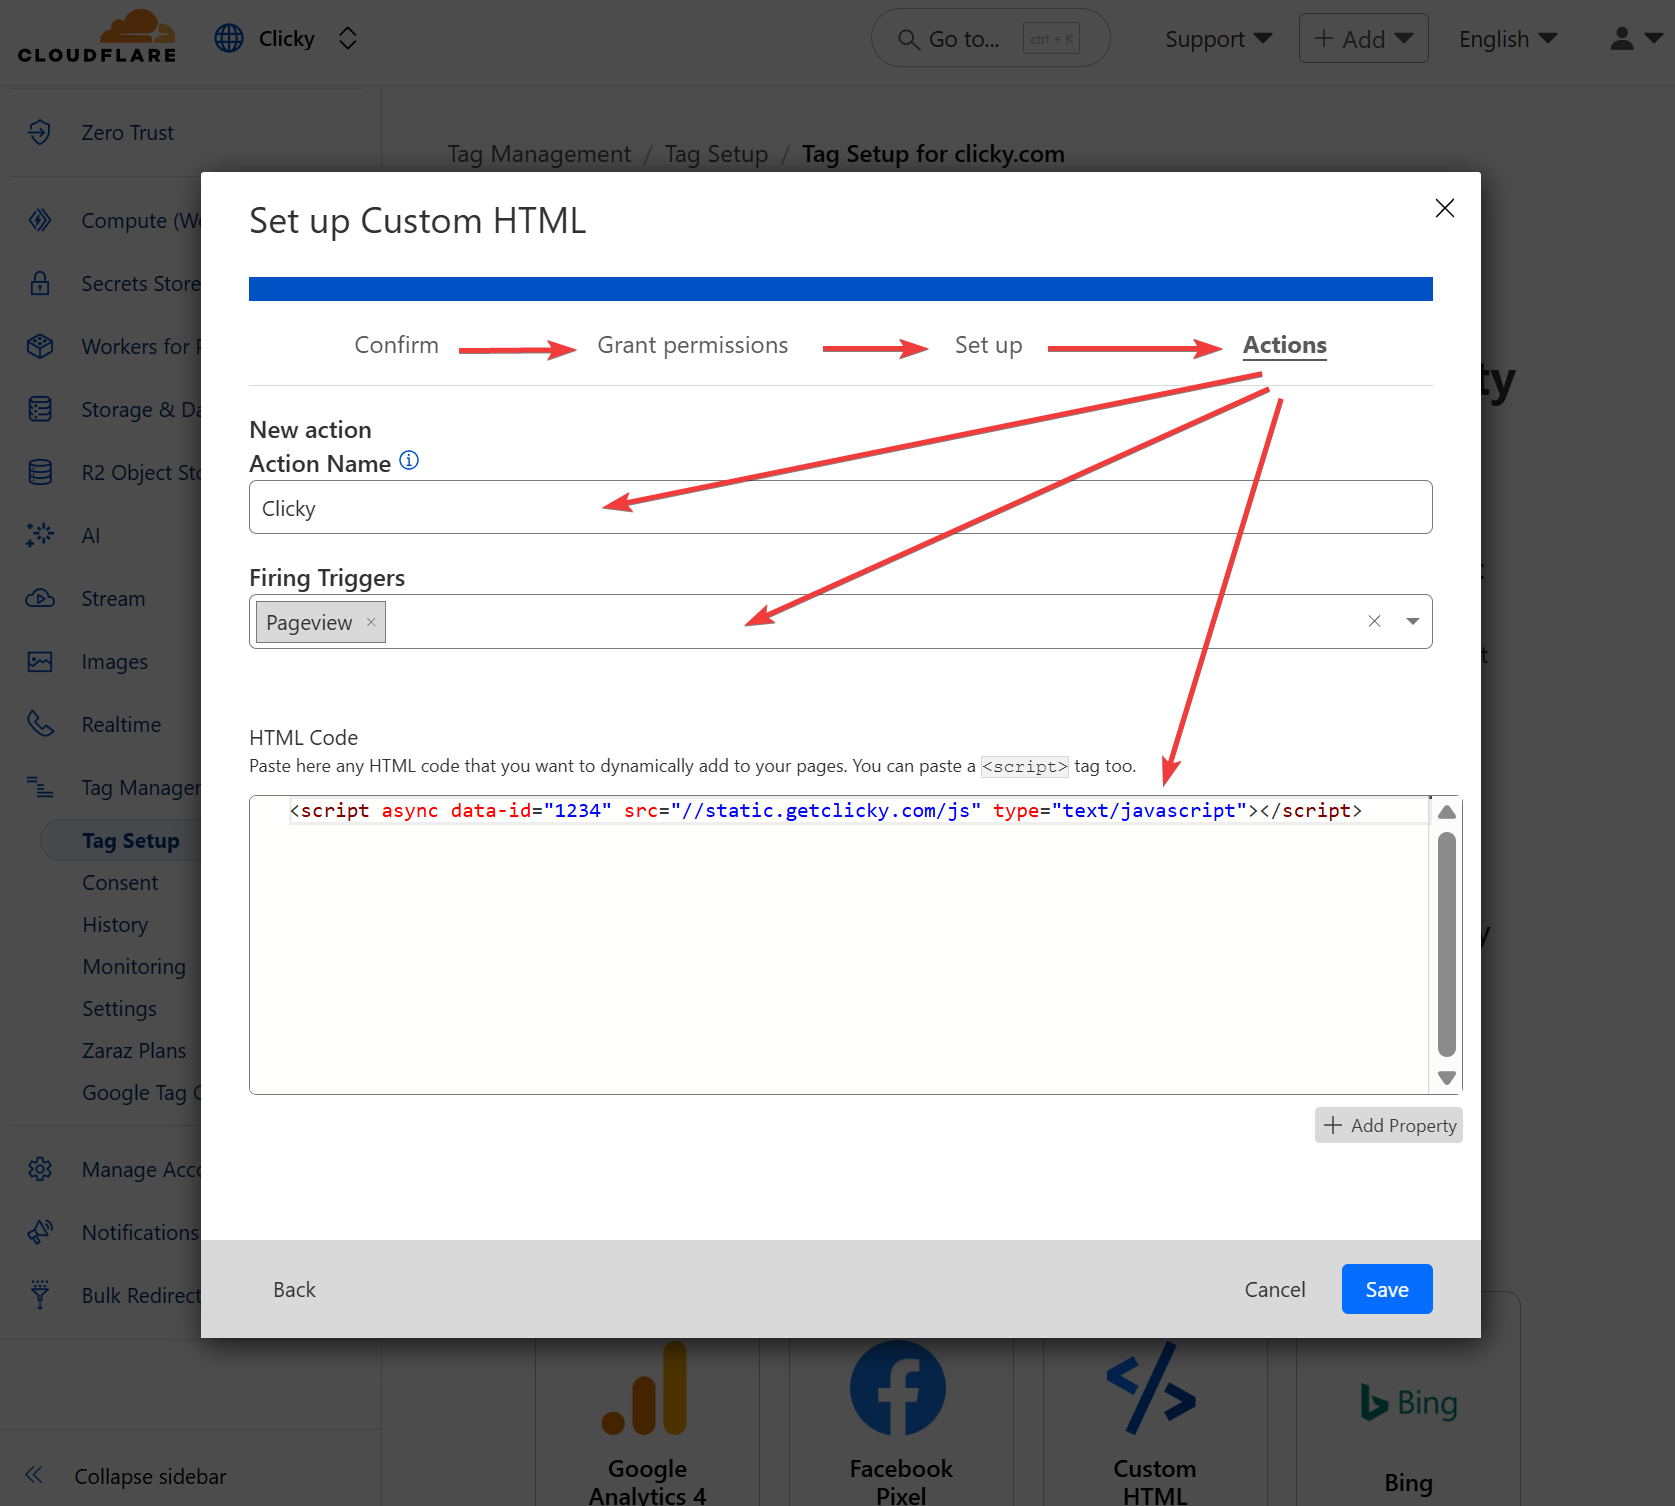
Click through the defaults on the next few screens until you see the "Actions" sub-tab shown below. Name it as desired, select the "pageview" trigger type, paste your tracking code into the box at the bottom, and click save.
You're done! You can edit or delete it later from this same page, or add others.
HTML / Your own custom website
If you built your own website, or someone did it for you (as opposed to running on a platform like WordPress), then you'll need to add
the tracking code to your website's HTML manually.
Does your site use Cloudflare? Good news, there's a
super simple method to add the code with their free "Zaraz" feature. Otherwise, read on...
Most sites have what are called "header" and "footer" files, which are files that are automatically included at the top and bottom of every page on your website. Headers and footers are handy because it makes it very easy to make global changes to your website's design. For example, say you wanted to add a new link to your navigation bar, or a new link to the footer of your website. By using header and footer files, you only have to make this change in one file, and every page gets the update automatically.
If your site uses this type of design (and if not,
it should), then all you need to do is paste our tracking code into your footer file. We recommend putting the code right before the closing </body> tag.
If your website does
not have footer files, you will need to manually paste the code onto every page of your website.
The tracking code for each registered site on Clicky is unique. You can find the tracking code for any of your registered sites within the Preferences area for that site. The link to Preferences is in the sidebar when viewing the reports for any of your sites on Clicky.
Google Tag Manager
Google Tag Manager (GTM) is a powerful tool to easily manage the various javascript tags on your site without having to edit your site beyond the initial install of GTM. If you use GTM, you'll be happy to learn that Clicky is fully compatible with it.
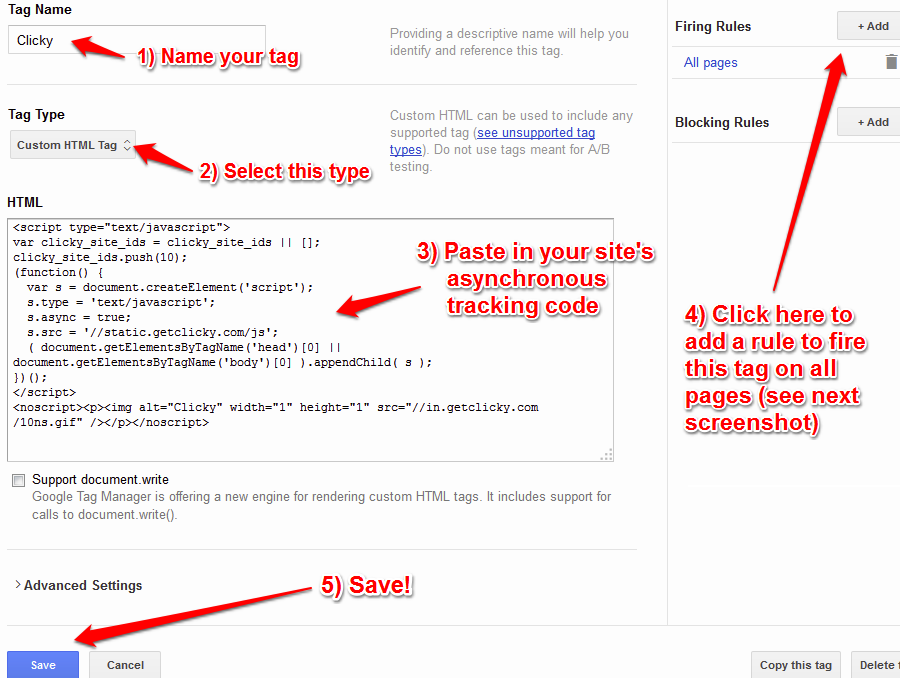
First, login to GTM. Go into the 'overview' section and add a new tag.
NOTE: These screenshots are out of date but the overall process is mostly the same.
Name your tag, select the 'Custom HTML Tag' option, paste in the code, add a rule to fire on all pages, and save.
IMPORTANT! Make sure to check the "tag manager code" option on your
tracking code page before copying it.
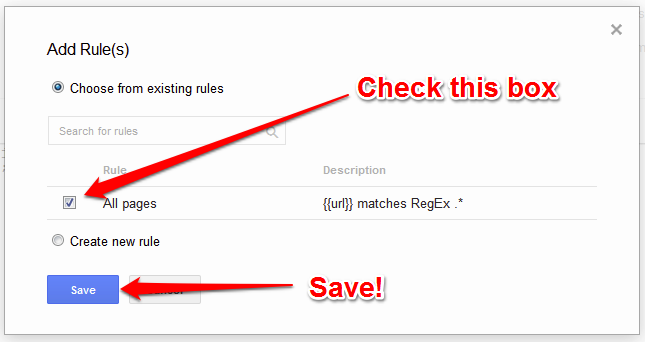
From the "add a rule" page, check the box and save.
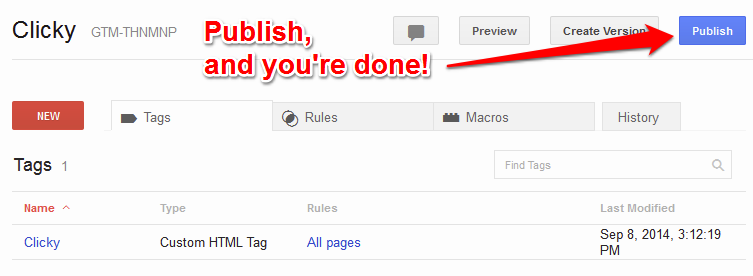
Publish your changes. Done!
Google AMP (Accelerated Mobile Pages)
AMP has support for Clicky built in.
Add the AMP analytics code to your site, in the
<head> area: (Note: don't do this more than once, e.g. if you're using another analytics service with AMP, you probably already have this line of code installed.).
<script async custom-element="amp-analytics" src="https://cdn.ampproject.org/v0/amp-analytics-0.1.js"></script>
Then, add this code to the
<body> section of your site. You'll need to replace the 'YOUR_SITE_ID_HERE' reference with your actual Clicky
site ID.
<amp-analytics type="clicky">
<script type="application/json">
{
  "vars": {
	"site_id": "YOUR_SITE_ID_HERE"
  }
}
</script>
</amp-analytics>
Shopify
Our Shopify tracking code will track all pageviews, sales, revenue, and add/remove cart actions. For sales, the code will also attach your customer's email address and order ID to their Clicky session. There are
additional actions 
that can be tracked, feel free to expand the code as needed.
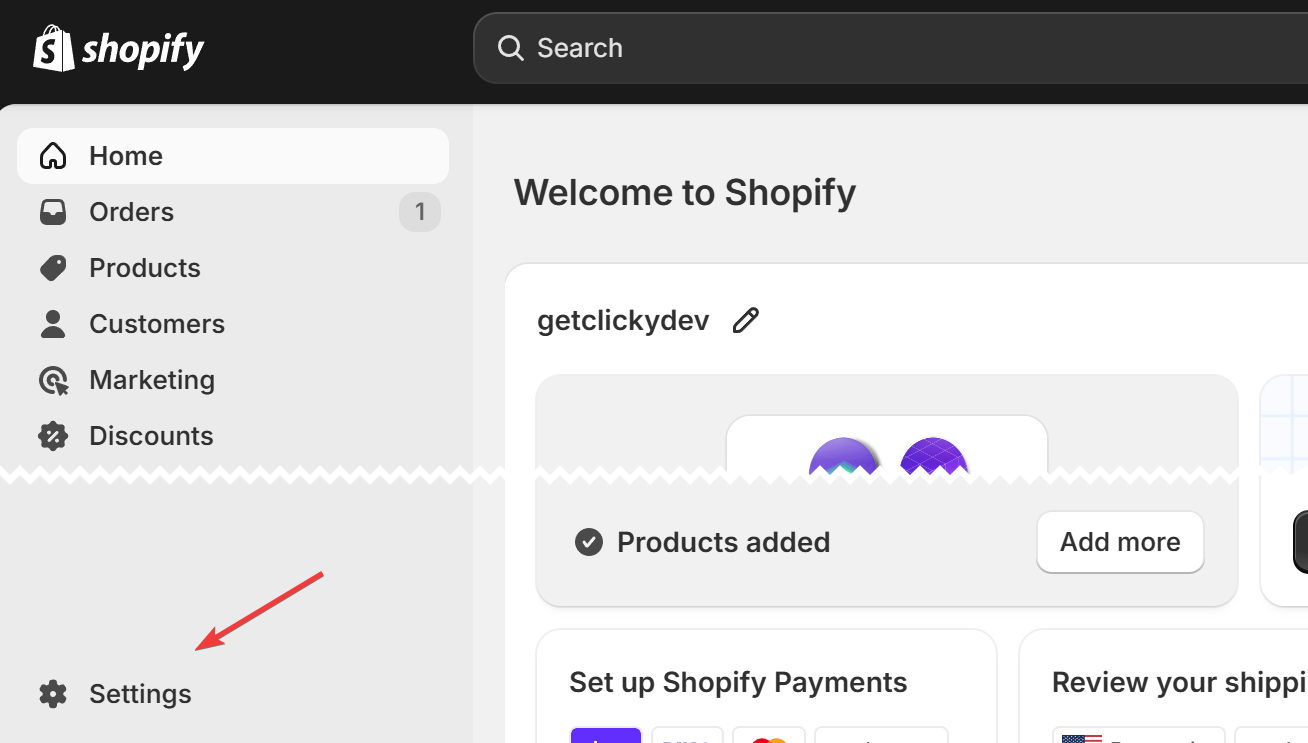
Click the "Settings" link in the bottom left corner of your shop's admin area:
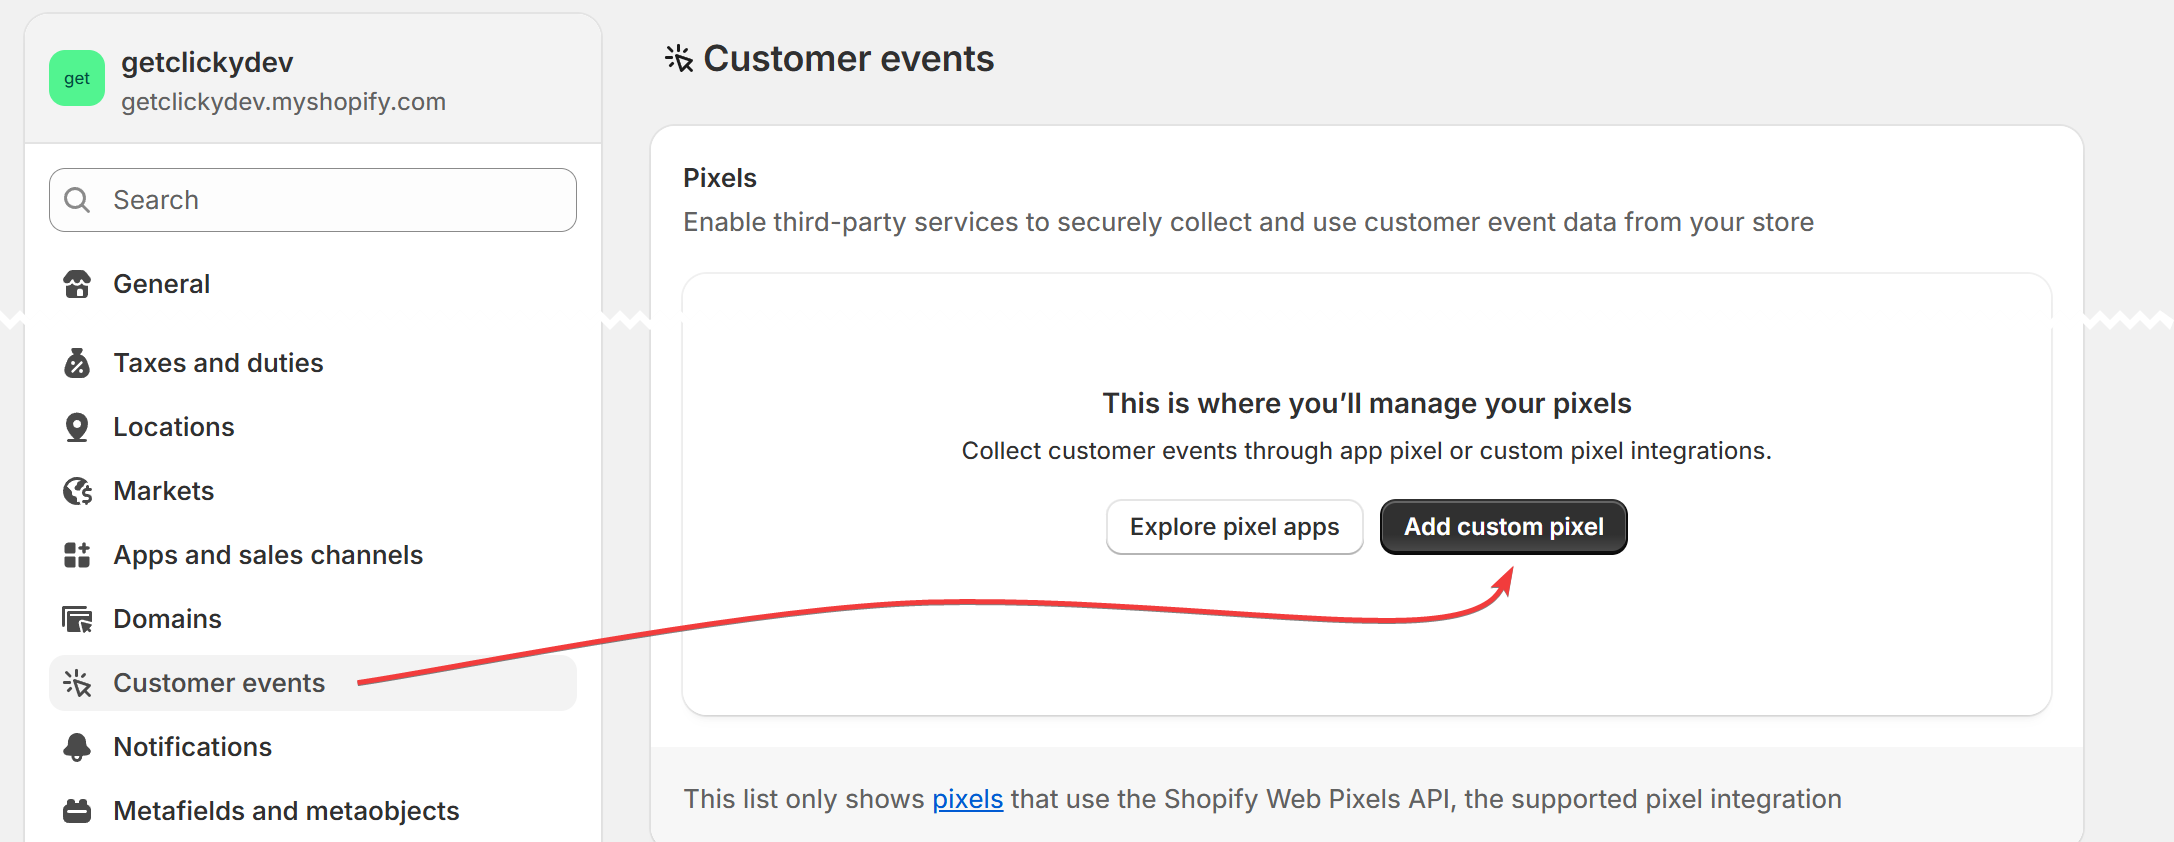
Click "Customer events" in the sidebar, then "Add custom pixel":
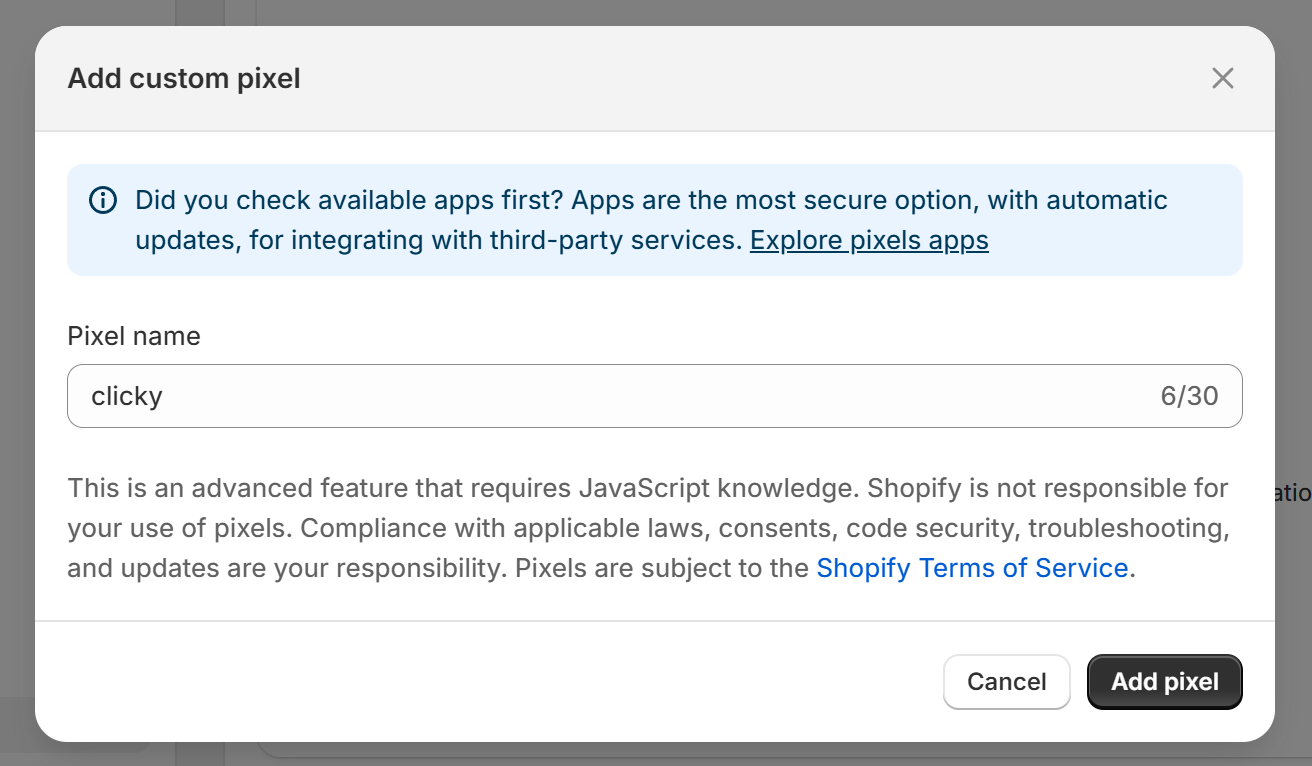
Give it a name, then click the "add pixel" button in the bottom right:
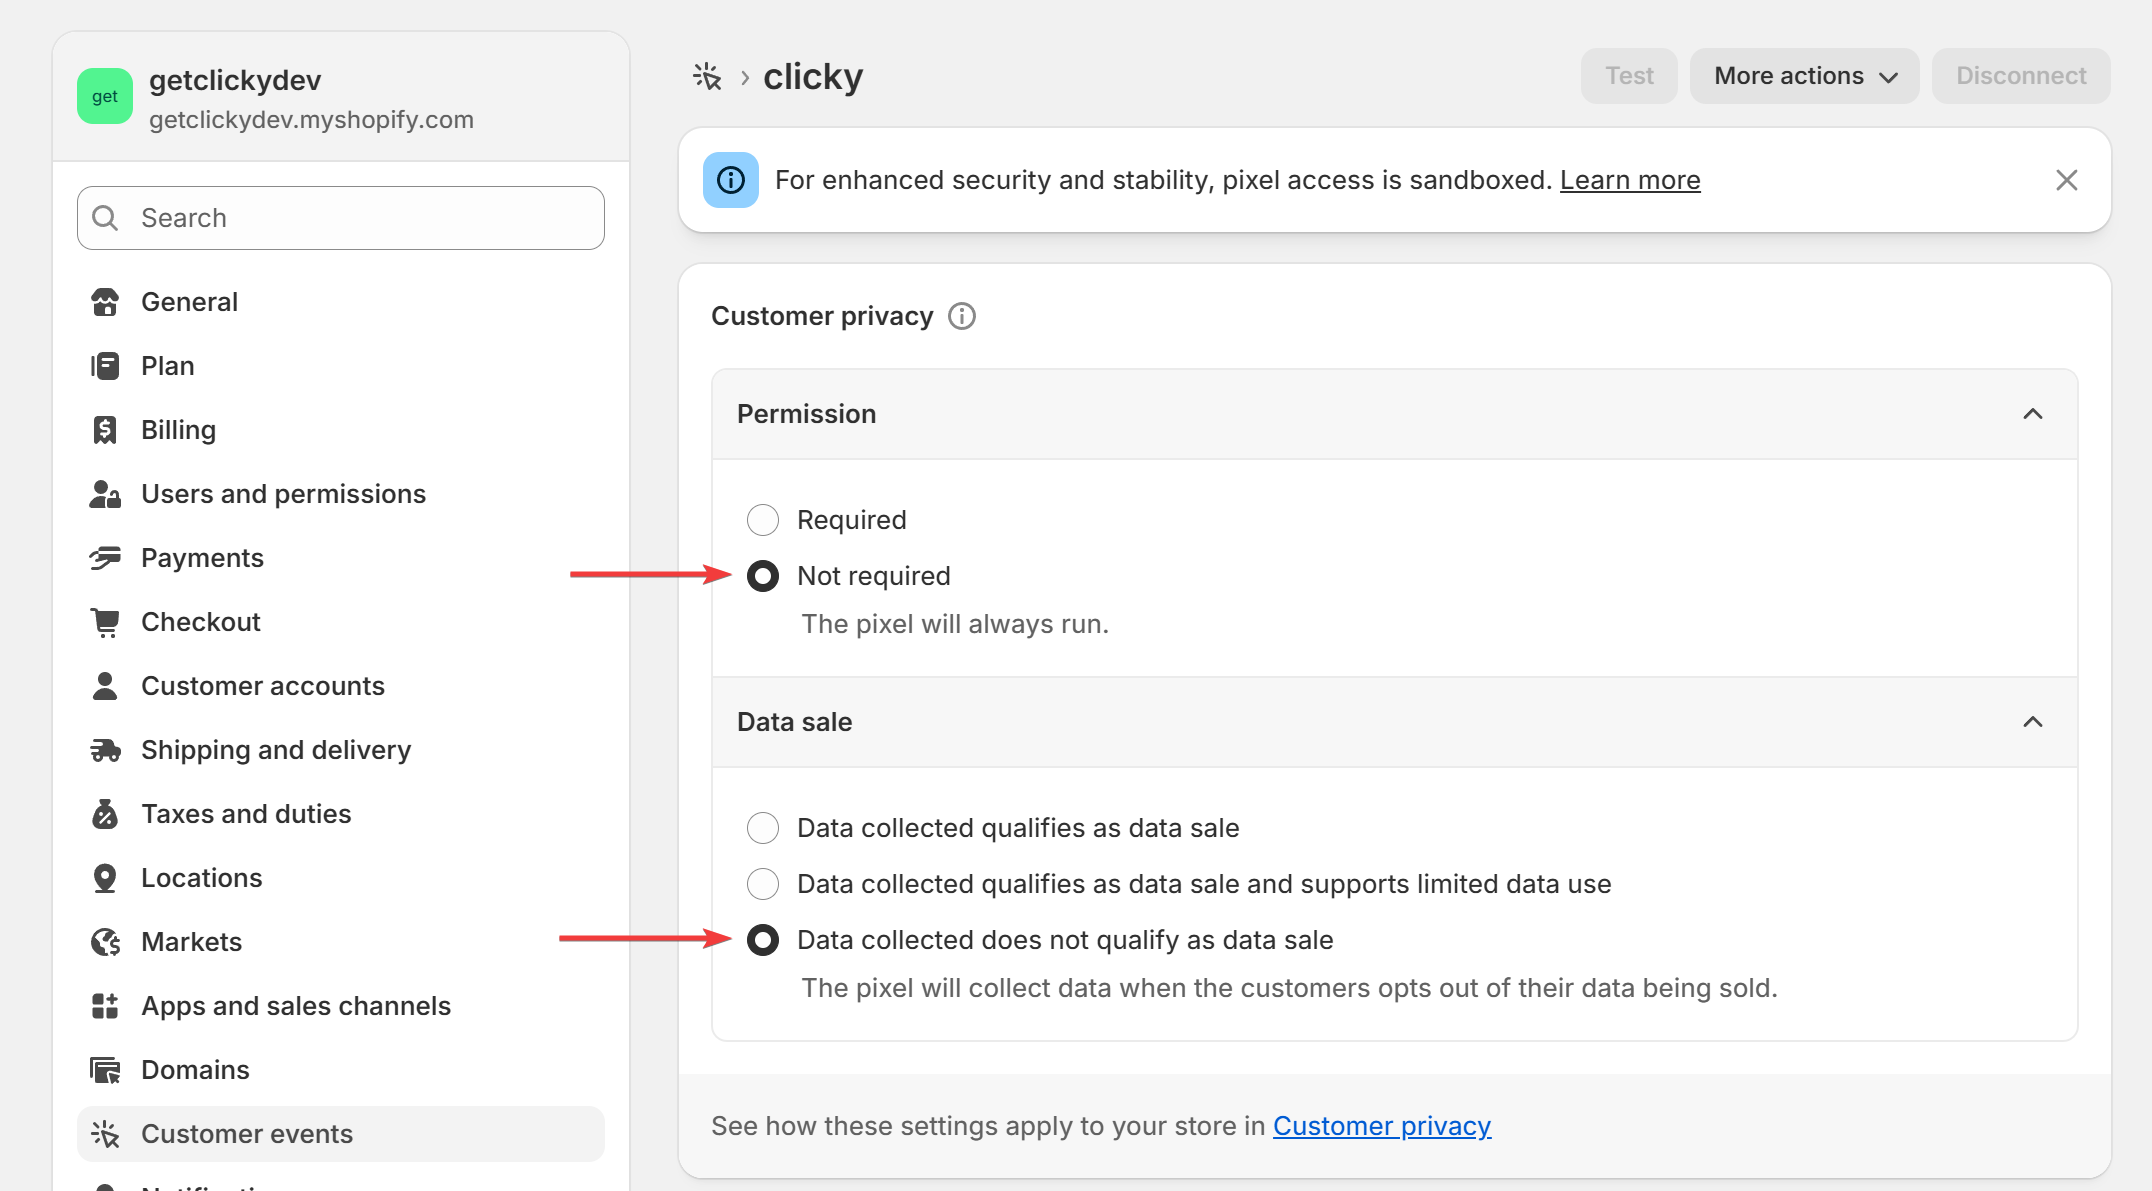
Expand the permission and data sale boxes and select the options shown below.
Clicky's default privacy settings 
will anonymize all IP address and disable tracking cookies automatically, so unless you have changed Clicky's defaults, these Shopify privacy features aren't needed.
Go to your Clicky
tracking code 
page, check the "tag manager" box, and copy the code into the "code" box on Shopify:
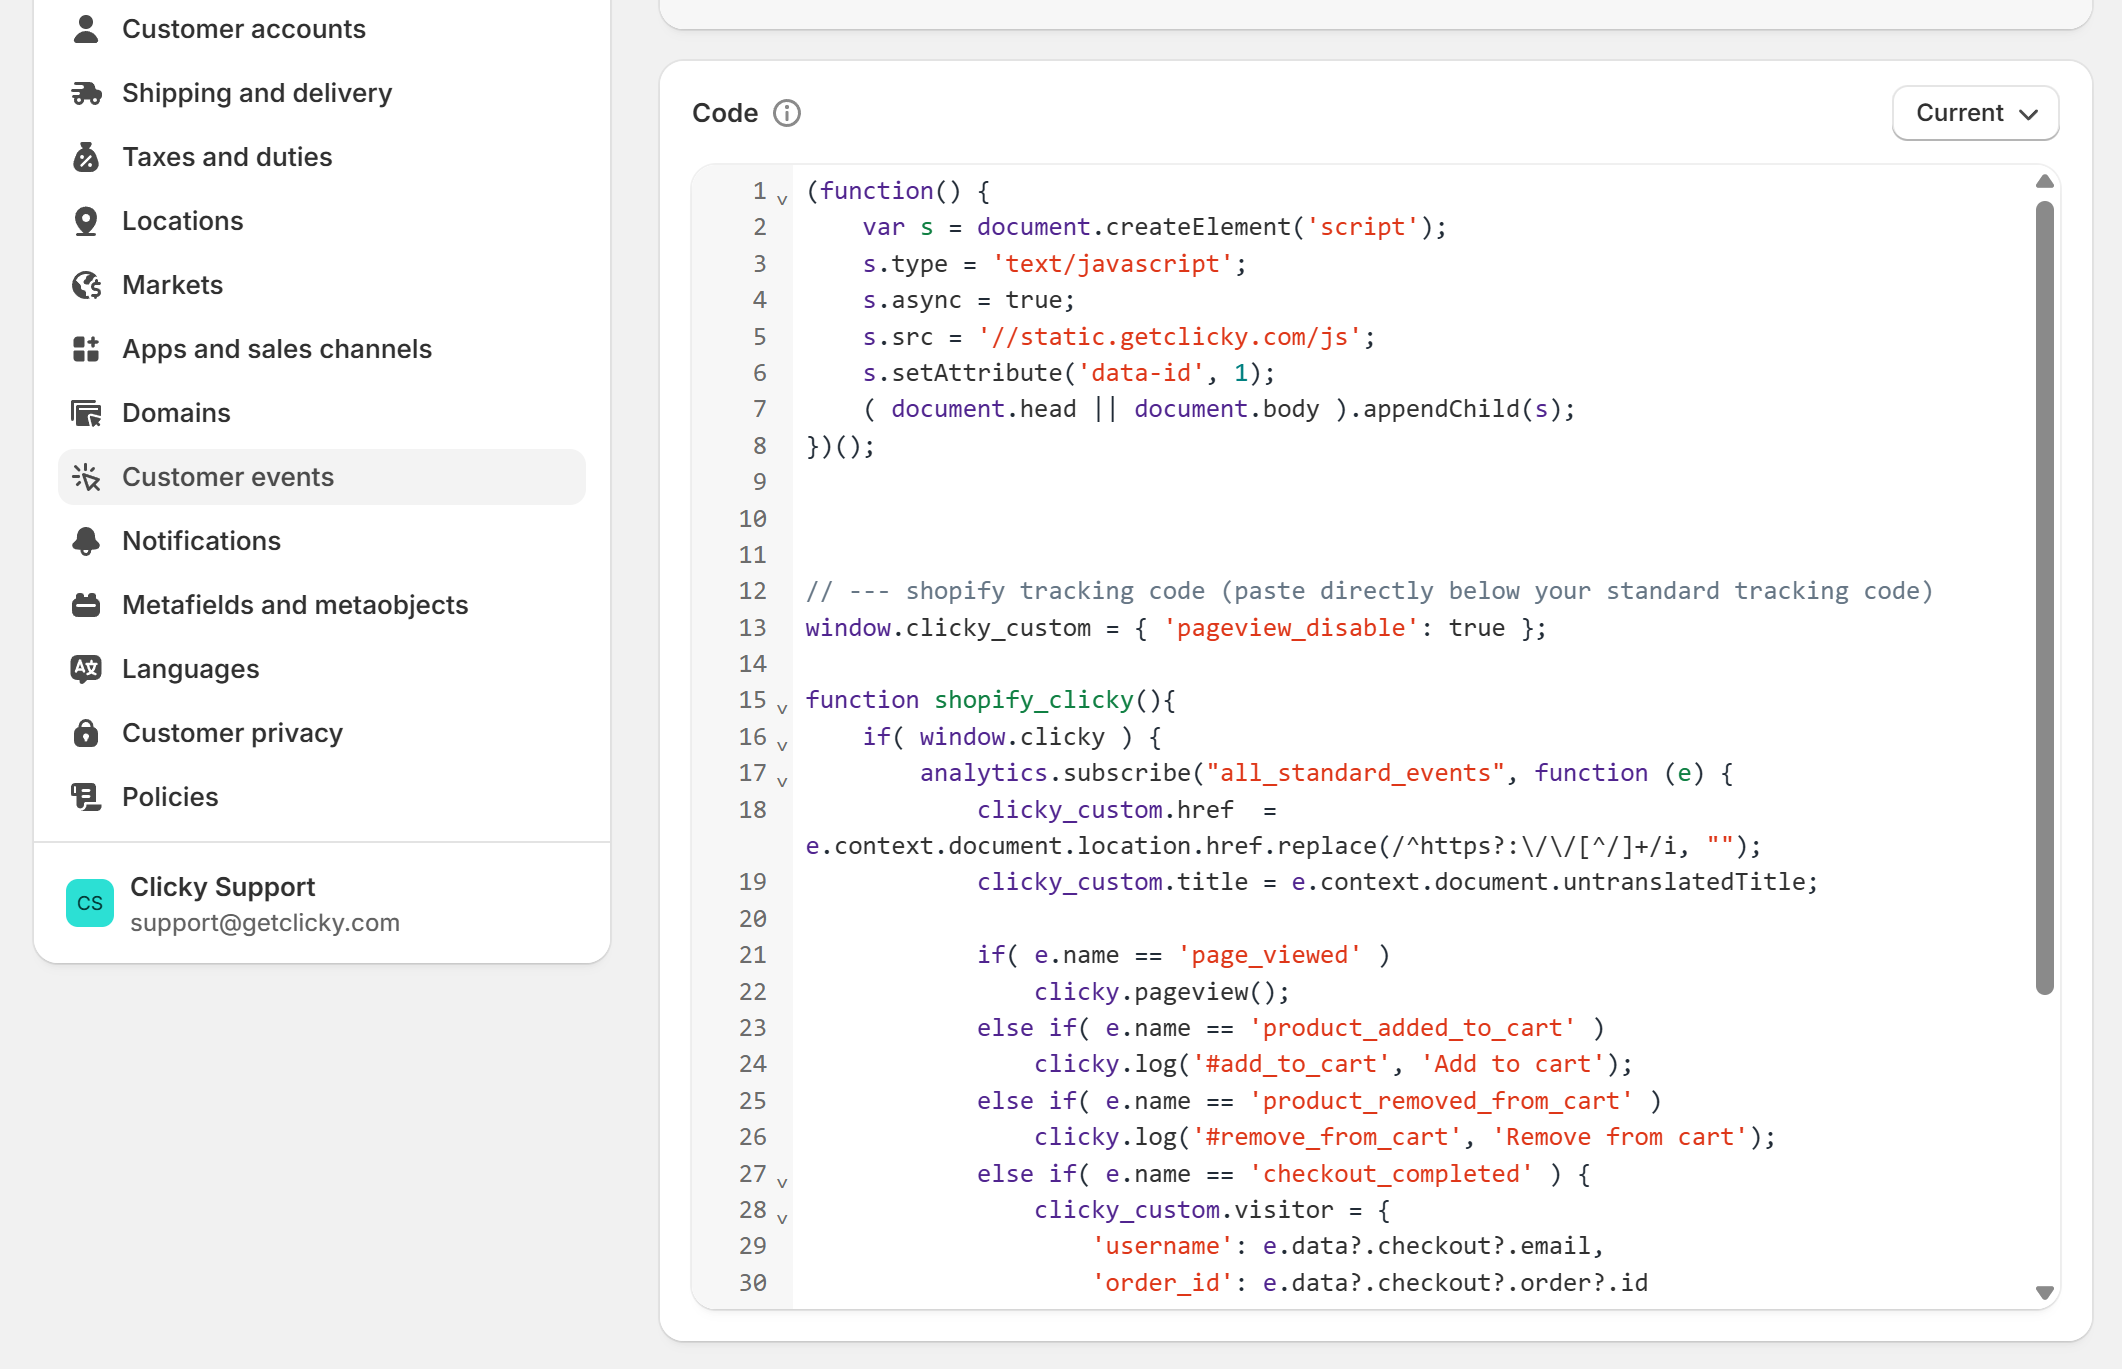
Copy
this code 
as well, and paste it right below the code from the last step. End result should look similar to this:
Save your changes:
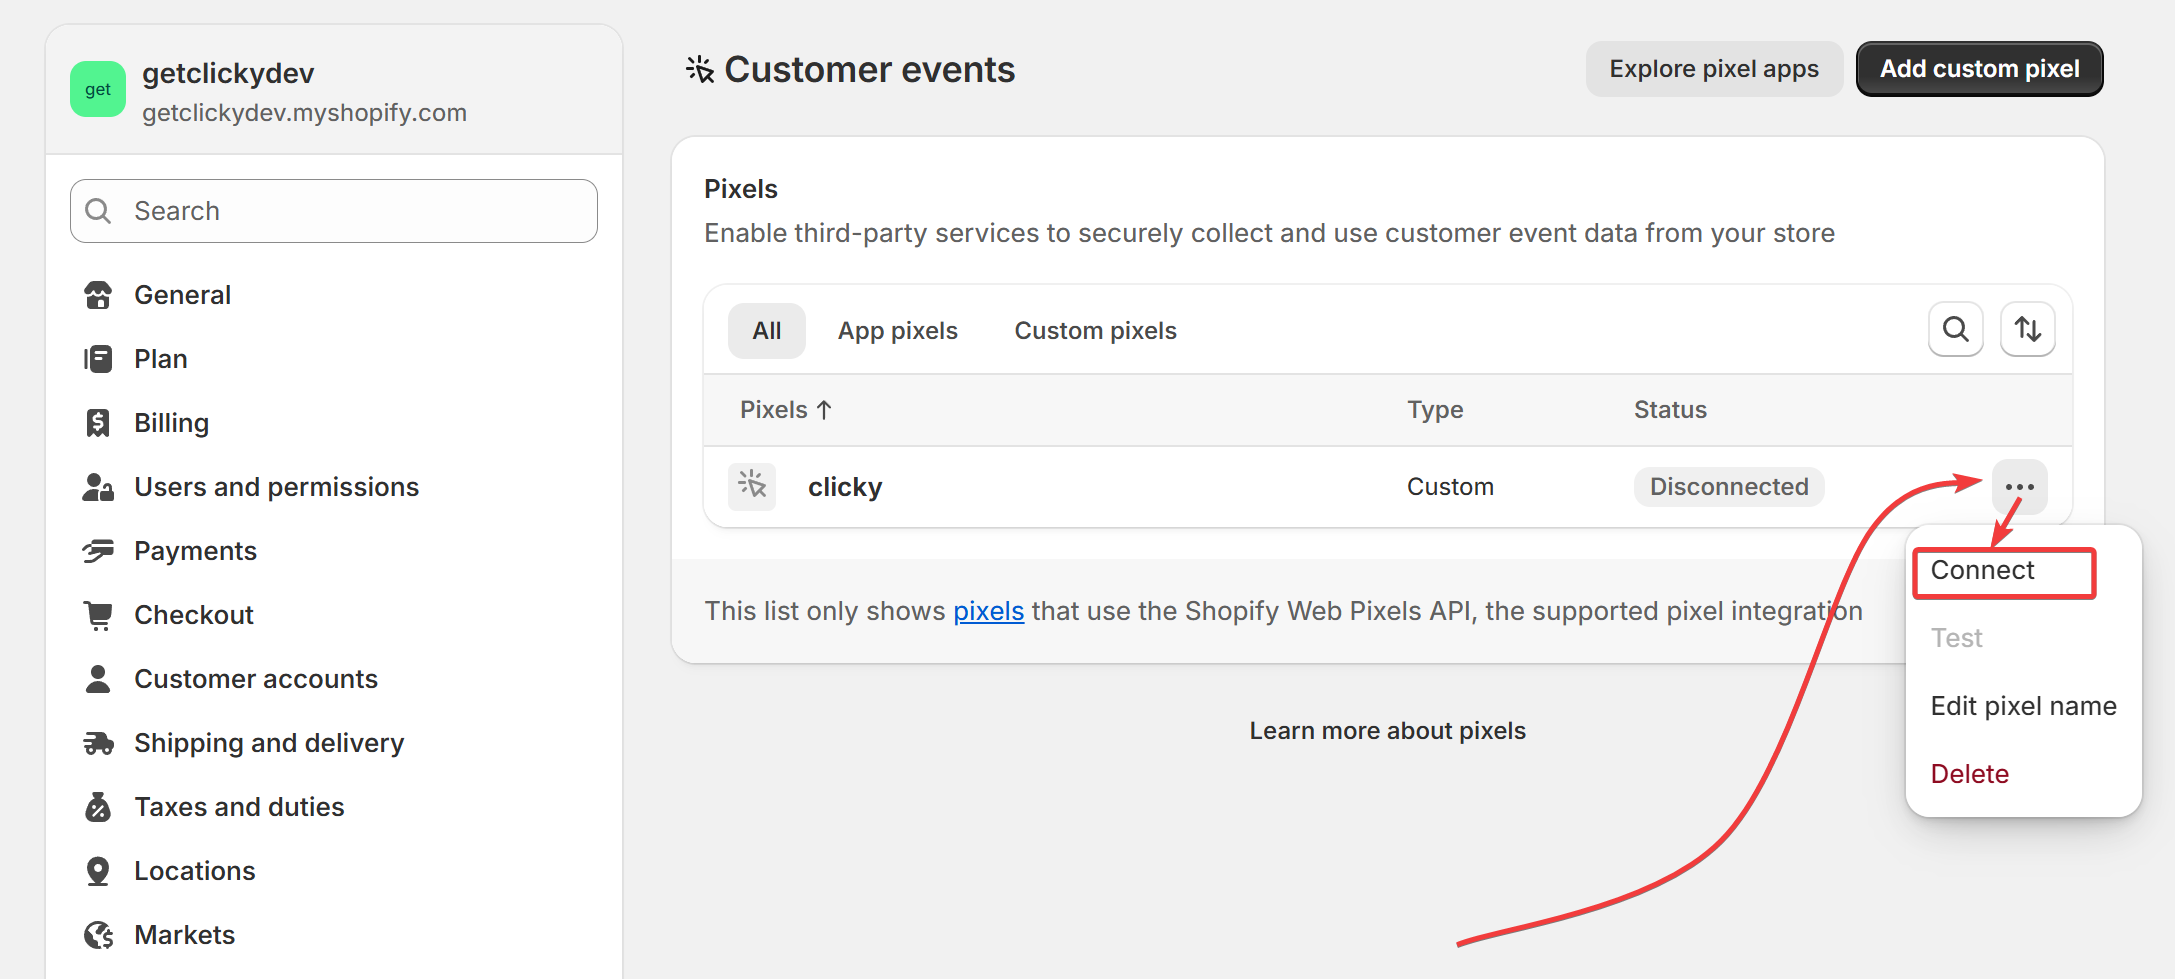
Go back to the main "Customer events" page, click the triple-dot menu, and "connect" the pixel:
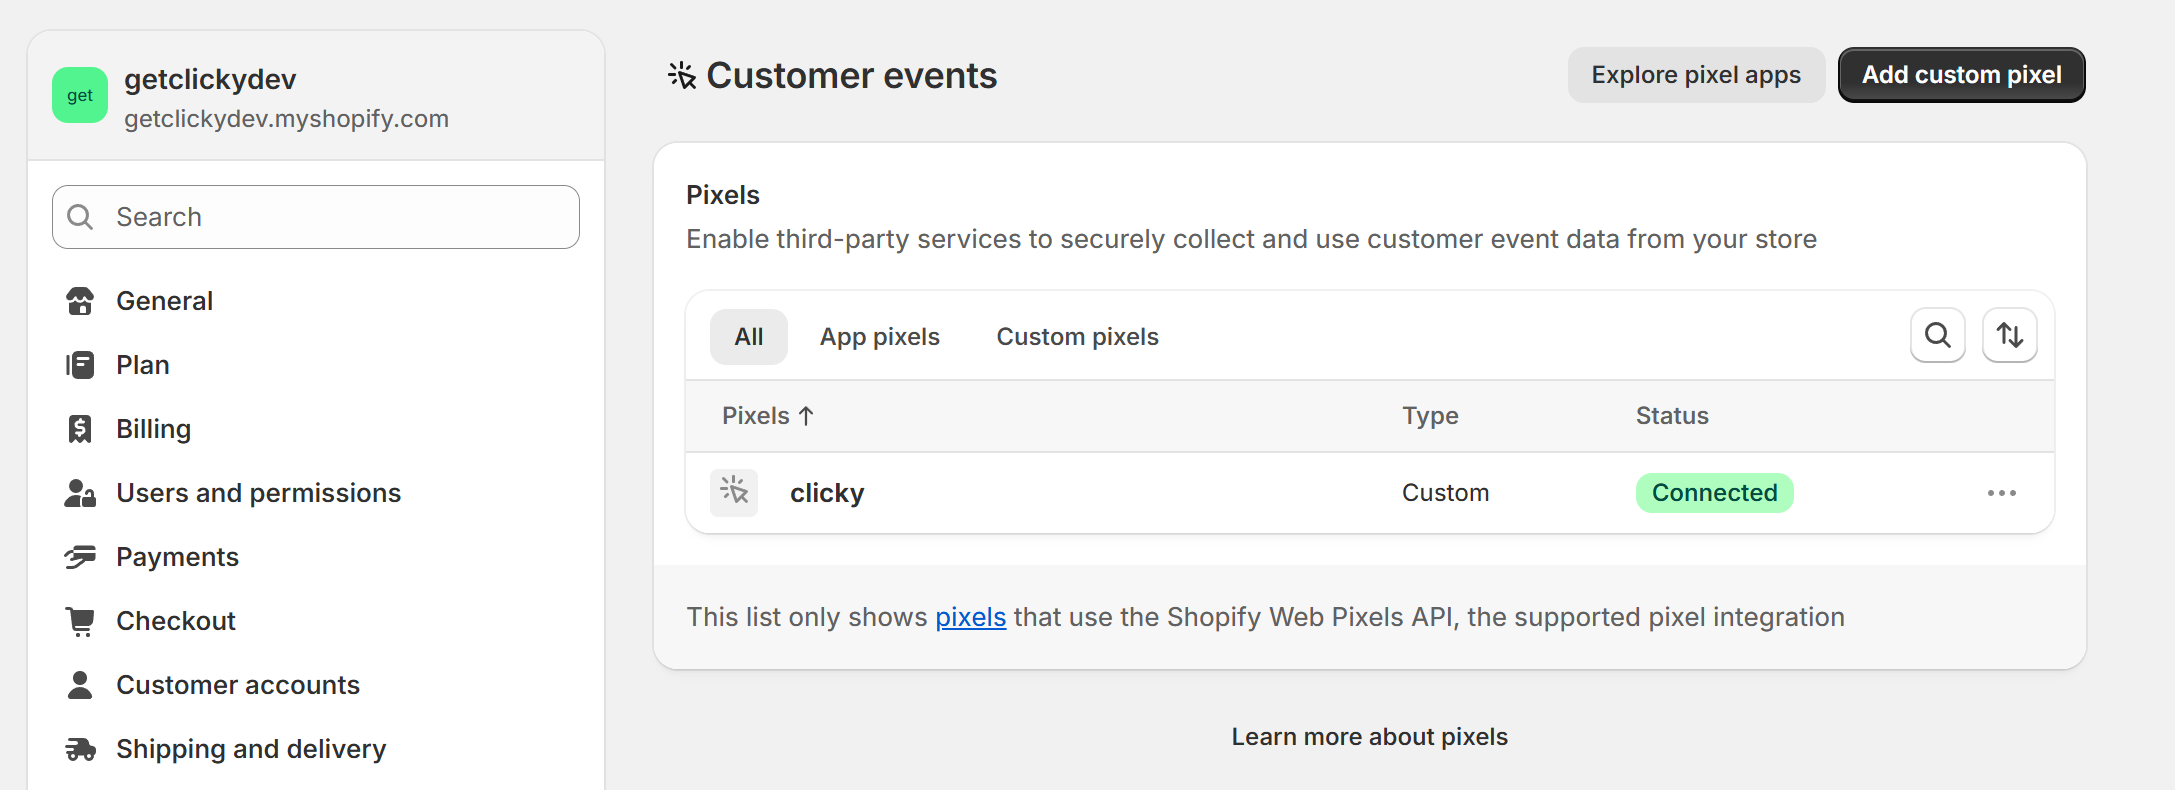
The page should now look like this. You're done!
WordPress.com hosted blog
If your blog is hosted on the wordpress.com domain, then you do not have the ability to add JavaScript to your page. However, Clicky also has an image based tracking system that you can use instead, which will work with wordpress.com blogs. It is not quite as detailed - for example, we can't track incoming searches or links to your site without JavaScript - but you may still find it quite useful. The image based 'no javascript' tracking code is on the same page as your normal tracking code, near the bottom.
Place this code in a text widget in your sidebar.
WordPress self-hosted
If you don't want to use the
plugin, or the plugin isn't working for you, you can still track your self-hosted WordPress site by adding the tracking code to your theme's footer.php file. Open your theme's footer.php file in the WP editor, and paste in your tracking code right before the closing </body> tag.
Squarespace
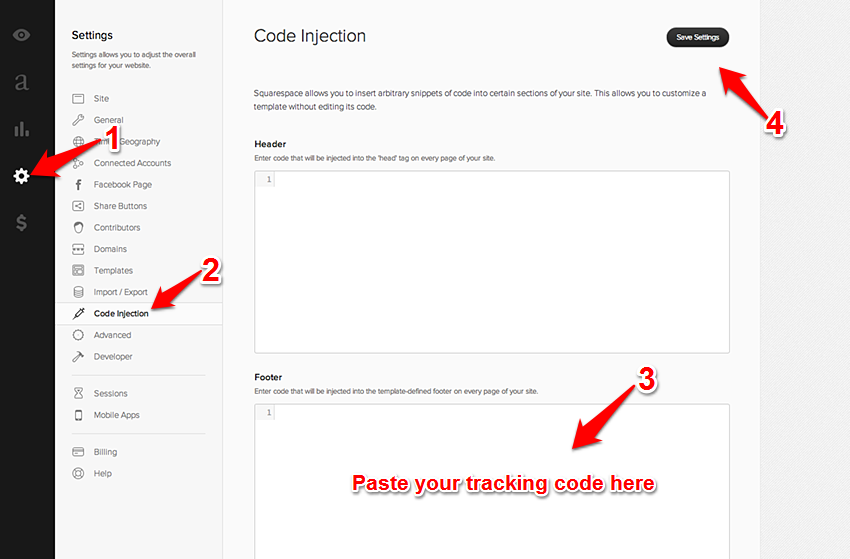
To track a Squarespace site, use the 'code injection' option in your admin area, to add the tracking code to your site.
Wix
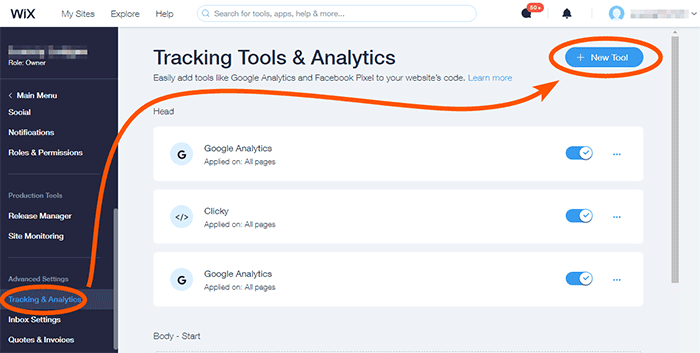
Go to your admin dashboard, then Advanced Settings, then Tracking & Analytics, and click on "New Tool" in the top right corner.
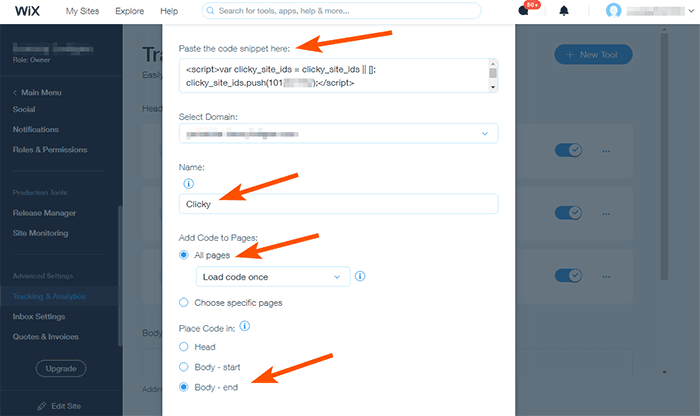
Choose "Custom", then paste in the code near the top, name it "Clicky", select the "All pages" option, and lastly "Body - end" - this will put the code at bottom of your site, recommended for best performance.
You can place the code in your header for perhaps slightly more accurate data (since it will load sooner, in theory). But if you do this, make sure to disable the "Track visitors without javascript" part of the tracking code. This is because that includes an img based backup tracking method, which isn't supported inside the <head> area of an HTML document.
Bigcommerce
Bigcommerce has a built in area to paste in your Google Analytics tracking code. You can use this same feature to paste in tracking codes from other services as well, including, of course, Clicky.
In the Bigcommerce control panel, go to Setup & Tools > Set up your store > Web Analytics. Check the box next to Google Analytics, then Save. Click the Google Analytics tab that appears at the top of the page. Paste your tracking code into the text box and Save changes. Done!
GoDaddy (Website Builder)
Please follow the instructions on
this page to install javascript on a GoDaddy site built with Website Builder.
Note, Godaddy doesn't allow code to be added to the mobile version of a website last we checked, so this will only track visitors on desktops/laptops.
Blogger / BlogSpot
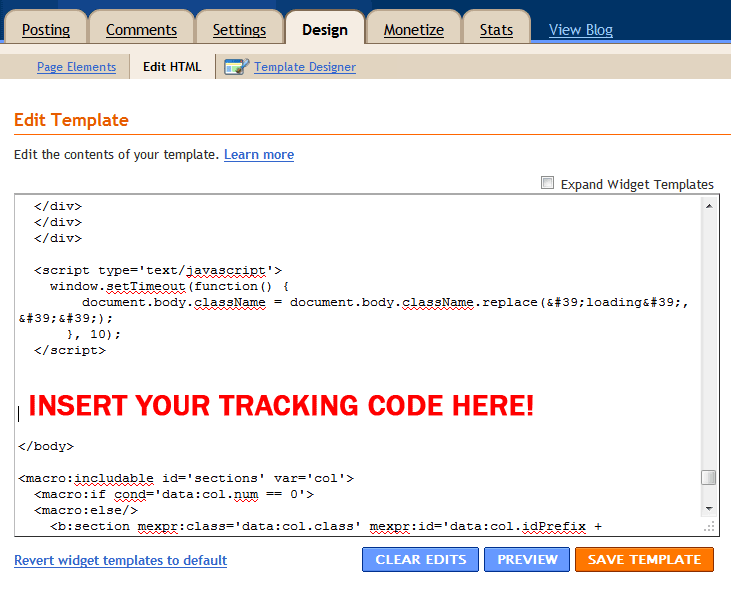
To install on this platform, you need to edit your blog's template. Click the "Design" tab at the top, then "Edit HTML". You will see some code in a form, as shown below. Unfortunately, the area that you want to place the code isn't at the very top or bottom, like it used to be. This means you need to use your browser's built in search-on-page tool (Ctrl+F), and then search for "</body>". Put a few lines of white space above the </body> tag in the form, then paste in your tracking code above it, as shown below.
Vistaprint
The code must be manually installed on each page you want tracked, using a "Custom HTML" widget.
Follow Vistaprint's instructions here for setting up a Custom HTML widget on a page of your site. Follow the same steps for each page you want tracked.
Webs.com
For a webs.com site, the tracking code must be installed manually on each page you want tracked, or (as shown below) you can drop it into the very bottom (footer) of your site and it should automatically get added to every page.
Note that the interface below is the 'new' webs.com. If your interface looks different, you are on the old version of webs.com and can opt-in to Clicky from there. The new version of webs.com does not have this opt-in unfortunately, requiring you to perform the steps below.
First, login to webs.com and click the 'builder' link in the top right corner.
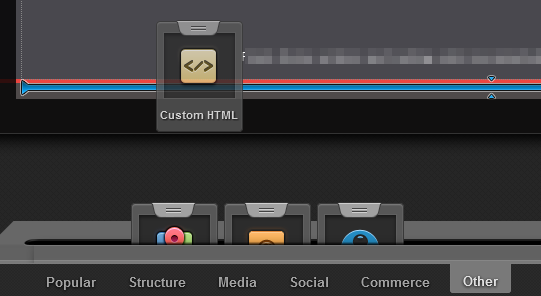
Click the 'other' tab at the very bottom, and you will see a few options. The one we will be using here is 'custom HTML'.
Drag and the drop the 'custom HTML' module into your page. Note in this screenshot, the blue highlighted area is where it will end up when we release the mouse. This is the 'footer' of your site, and if you put this module here, it will be automatically included on every page of your site. If you're unable to place the code in the footer area, you will have to add the code to every page of your site.
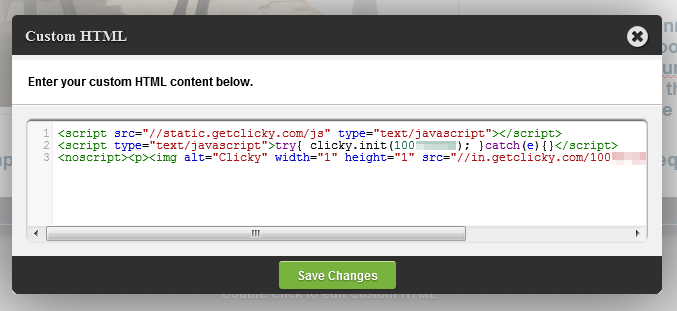
After you have placed the module, double click it to edit.
Paste your
tracking code into the box and click the save button.
Click the 'pubish' button in the top right corner of the page to save your changes. You're done!
Tumblr
To track a Tumblr site, you need to edit your theme to paste in the code. Note that this also means if you change themes in the future, you will have to follow the same steps.
From your Tumblr control panel, go to: Customize > Theme > Use Custom HTML.
Find the closing </body> tag, and paste your Clicky tracking code directly
before this tag. Click save and you're done!
Note: Tumblr uses different HTML for the mobile version of your site, so you'll need to add the code to that too if you want it tracked.
Instructions here.
Weebly
Log in to Weebly and select to Edit your site. Paste your
tracking code into the
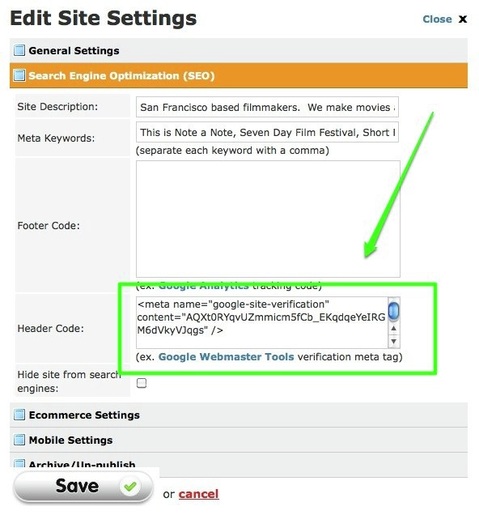
footer section. The screenshot below is taken from Weebly's support area and shows code going into the header. Our code works in the header too, but we highly recommend the footer. In this screenshot, it is the field directly above the highlighted one.
Joomla 4+
There is a
plugin with extra functionality, but we offer these instructions as well to get basic tracking working, if you can't use the plugin.
These are instructions for installing the code using
Template Creator CK, a popular plugin for creating templates for Joomla and WordPress websites. You may be using a different template manager, but a common feature of all of them is to have a "custom code" area, so similar instructions should apply.
From your admin dashboard:
- In the sidebar, go to "Components", then "Template Creator CK"
- Go to "Templates List"
- Click on an existing template to edit it, or create a new one
- In the new sidebar it shows for your template, click "Code"
- Click "Custom Code"
- Paste the tracking code in the second box labeled "Custom code before </body>"
- Click the "Save and close" button on bottom right
Webnode
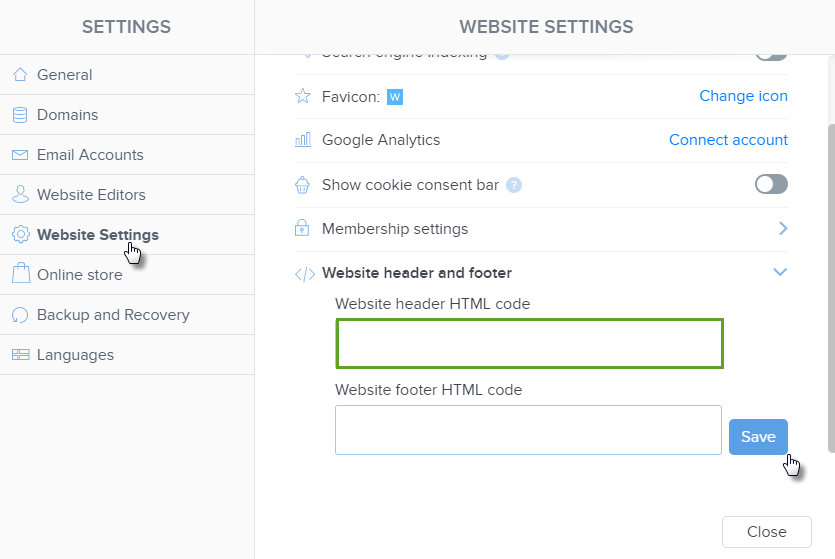
Log in to Webnode and click the Settings link in admin header area. Then click "Website settings" in the sidebar, and paste your
tracking code into the "Website header HTML code" section. The screenshot below is taken from
Webnode's support site
Webflow
Go to Project Settings for the site you’re working on, then click the Custom Code tab and paste your
tracking code into the "Head code" section. Click the save button in the top right corner, and you're done!
The screenshot below is taken from
Webflow's support site. The article is written for
Google Tag Manager but the same basic logic applies to the code from any third party service.
Smarty
To use Clicky with a
Smarty website, you'll need to place your tracking code in between
{literal} tags. Example:
					{literal}

					<script src="http://static.getclicky.com/js" type="text/javascript"></script>

					<script>try{ clicky.init( xxx ); } catch(e){}</script>

					{/literal}
Duda
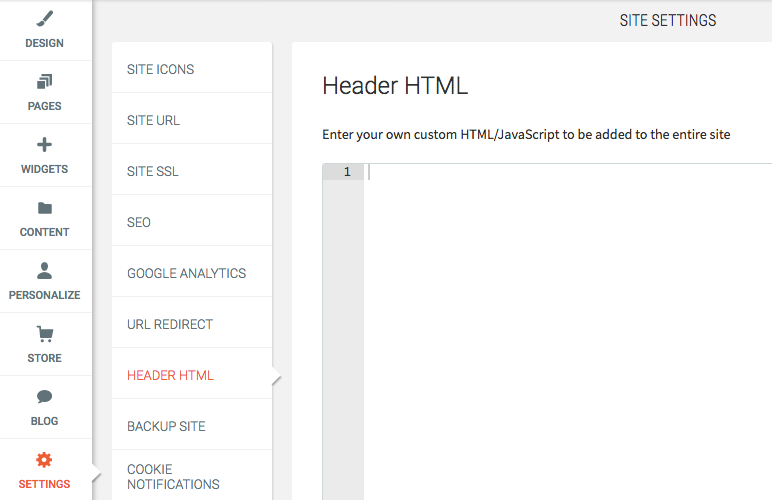
In your admin area, go to Settings, then Header HTML. Paste your tracking code in the box, click Save at the bottom, and you should be done!
Adobe Muse
There's a plugin available
here, or you can install the code manually as described below.
To get the code installed on all pages automatically, go into the 'Page Properties' for the 'Master' page,
as shown here.
Paste your tracking code into the box labeled "HTML for <head>"
as shown here, then click "OK" and save your site. Done!
MediaWiki
Install the
HeadScript extension. Open your LocalSettings.php file and create a variable called
$wgHeadScriptCode that contains the tracking code. Save, upload, and you're done!
Here's an example (replace the two 123's with your site ID), assuming you have at least 1.27 from 2016. Full instructions for installing this extension and setting up the variable depending on your version of MedaiWiki are in the link above.
$wgHeadScriptCode = <<<CLICKYCODE

<script>var clicky_site_ids = clicky_site_ids || []; clicky_site_ids.push(123);</script>

<script async src="//static.getclicky.com/js"></script>

<noscript><p><img alt="Clicky" width="1" height="1" src="//in.getclicky.com/123ns.gif" /></p></noscript>

CLICKYCODE;
SharePoint
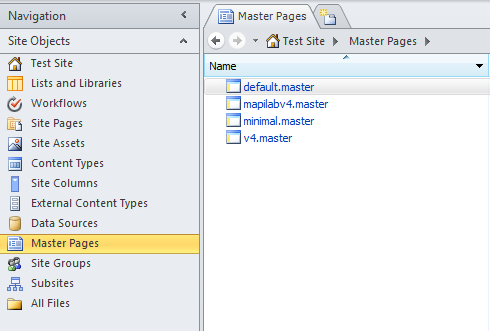
In SharePoint Designer, open the control panel for your website. In the sidebar, go to Site Objects, then Master Pages, as shown in the screenshot below. You will see all of the pages of your site listed here. Unfortunately you will need to add the code to each page individually. Paste the code inside the <head> tag of each page, and you're done!
Desktop & mobile apps
Google Chrome widget (ClickyChrome)
Click here to download
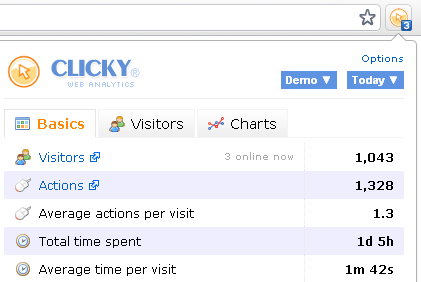
- Import all your sites automatically from Clicky, or add them manually if you prefer. Select which one you'd like to actively monitor from the site dropdown menu in the ClickyChrome popup.
- The toolbar icon will display either the number of visitors currently online, total number of visitors today, or total number of completed goals today. The data is refreshed every minute so you'll always be up to speed.
- From within the ClickyChrome popup, you can view basic site stats for various date ranges, see comprehensive information about your site's last 5 visitors, and display graphs for visitors, actions and top browsers over the past 30 days.
- Using HTML5 desktop notifications, you can chose to be alerted whenever a visitor completes a goal on the site you're currently monitoring.
- If you are browsing your site and would like to see the stats for that particular page, just right-click and select "View page stats", and that will take you to the Clicky stats page for the URL you are currently viewing.
Libraries/Other
Meteor.js
					Meteor.startup(function () {

					  $.getScript('//static.getclicky.com/js', function(){

					    try{ clicky.init( SITE_ID ); } catch(e){}

					  });

					});
Contact Form 7
Contact Form 7 is a Wordpress plugin for managing contact forms on your site. Wouldn't it be great if you could track the form submissions? Thankfully this plugin provides a javascript hook so we can log the submission as an action and/or a goal.
Copy the code into the Additional Settings field at the bottom of the contact form management page of the plugin.
Log as an action:
				document.addEventListener( 'wpcf7submit', function( e ) {

				  clicky.log('#contact-form', 'Contact Form');

				}, false );
Log as a goal:
				document.addEventListener( 'wpcf7submit', function( e ) {

				  clicky.goal('Contact Form');

				}, false );
Log as an action and a goal:
				document.addEventListener( 'wpcf7submit', function( e ) {

				  clicky.log('#contact-form', 'Contact Form');

				  clicky.goal('Contact Form');

				}, false );
Segment.io
Click here to download
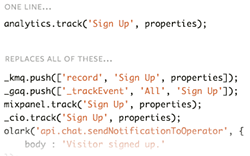
- No more littering your app with tons of different analytics providers. Instead, instrument your app once cleanly and then send your data to any analytics service you want.
PHP (server side logging)
Click here to download
You can make server side data logging requests to our tracking API with this PHP code. Edit to include your
site ID and admin site key.
C# / .NET (server side logging)
Click here to download
You can make server side data logging requests to our tracking API with this C# code. Edit to include your
site ID and admin site key.
Rails "Turbo Link" tracking
Rails 4+ uses turbo links by default (similar to pjax) which loads the content of the page and inserts it without doing a full page refresh. Unfortunately without a full page refresh, Clicky won't track the new page loading by default.
However, Turbo links provide a callback when the user changes page, which you can hook into like this to track with Clicky:
Rails 4:
$(document).on 'page:change', ->
if window.clicky?
clicky.log( document.location.pathname + document.location.search, document.title, 'pageview' );
Rails 5+:
$(document).on 'turbolinks:load', ->
if window.clicky?
clicky.log( document.location.pathname + document.location.search, document.title, 'pageview' );
Temboo
Click here to download
- Temboo builds efficient, smart shortcuts that you can drag and drop right into your code. More than just code snippets, these ready-to-use processes make API integration easy, taking care of authentication, credential management, updates, and more. Temboo over 100 popular APIs, including Clicky.
- Temboo SDK supports PHP, Python, Ruby, Java, Node.js, with more languages coming soon.
Pushover.net for Uptime alerts
Click here to download
Relay Clicky's uptime alert web hooks through
pushover.net to receive mobile notifications.
 0 online
0 visitors
0 actions


